MailBurst™: Installation
Note: for SIMS, please see the included MailBurst 2.1 Addendum file.
Installation
Before installing MailBurst, we recommend that you have your DNS and
EIMS/AIMS working properly for all the domains you wish to handle. Once
this is done, adding MailBurst to your server is simple.
Once you have EIMS/AIMS working properly, please read over our mini-tutorial on how MailBurst and EIMS/AIMS interact.
Installation - New Users
First note that if you are using MailBurst with EIMS 1.x you will have
improved performance if MailBurst is on the same volume
that contains your System Folder. For EIMS 2.x, 3.x, or SIMS this
is not a factor.
- Copy the application and the MailBurst folder into the same folder
as your EIMS/AIMS application (again, for SIMS, see the addendum file).
- Edit the MailBurst configuration to your liking
- Configure EIMS/AIMS as shown below (if you are not running MailBurst from
the AIMS/EIMS folder, be sure to type a correct path to the MailBurst:mail folder).
EIMS 1.2 and earlier:

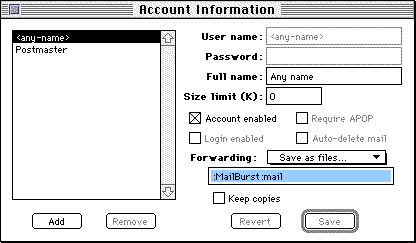
The accounts screen in EIMS 1.2
Set up the AIMS/EIMS any-name account to "Save
as files..." to ":MailBurst:mail" note the placement of the single
colon before the first "m".
EIMS 2.x:

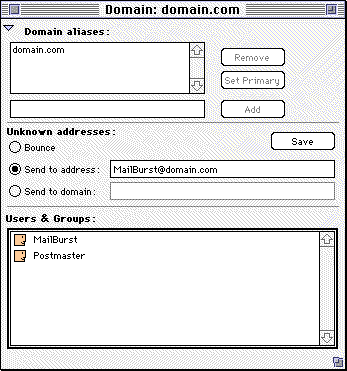
 To have EIMS 2.x or 3.x save mail into the MailBurst:mail folder, you will have
to set up a send to address
for each domain (see the first image above). Then, once EIMS is routing unknown mail to a
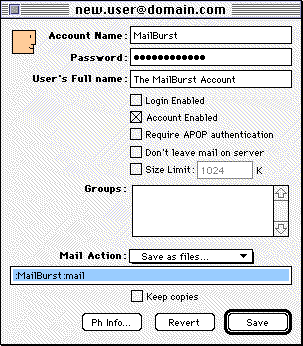
single user (we use the MailBurst user in one domain), we set that user to save all mail as
files in the MailBurst:mail folder (see the second image) and note the placement of the single
colon before the first "m".
Installation - Users upgrading to MailBurst
- Quit your copy of DC&R Util 5 1.0 or 2.0
- Back up your existing config file.
- Copy the MailBurst application into the EIMS/AIMS folder
- Copy the MailBurst folder as well. (This folder contains all the former
Util5, Util5 Hold, etc. folders.)
- Change the any-name account to save mail into the ":MailBurst:mail" folder
rather than the ":Util5" folder. (This step is optional, as MailBurst will
first look for a Util5 folder and if it is present, MailBurst will look for
files from EIMS there. We recommend changing EIMS to save files into the
new MailBurst:mail folder.)
- Open the old "Util5" folder and drag any messages there into the "MailBurst:mail:"
folder. Drag files in your "Util5 hold" into the "MailBurst:hold" folder, and the
same for your drop folder.
- Copy and rename your config file, replacing the characters "DC&R Util 5" with "MailBurst" (see the
sample config file in the MailBurst folder).
- Now you are ready to start up MailBurst.
- Note that in order to get the new MailBurst program icon, you will have to remove DC&R Util
5 from your disk and rebuild the desktop database. (This is not a requirement,
but if you want to see the new program icon, a desktop rebuild after DC&R Util 5 is deleted
will do the trick.)
Please note
that your existing config file will be re-written when you edit it with
MailBurst. All comments will be removed and all fields within lines
will be separated with TAB characters.
Back
© 1999-2001 David M. Dantowitz


 To have EIMS 2.x or 3.x save mail into the MailBurst:mail folder, you will have
to set up a send to address
for each domain (see the first image above). Then, once EIMS is routing unknown mail to a
single user (we use the MailBurst user in one domain), we set that user to save all mail as
files in the MailBurst:mail folder (see the second image) and note the placement of the single
colon before the first "m".